Article Applies To:
Affected SonicWALL Security Appliance Platforms:
Gen5: NSA E7500, NSA E6500, NSA E5500, NSA 5000, NSA 4500, NSA 3500, NSA 2400, NSA 240.
Gen4: PRO series: PRO 5060, PRO 4100, PRO 4060,PRO 3060, PRO 2040, PRO 1260.
TZ series: TZ 100, TZ 100 Wireless, TZ 200, TZ 200 W, TZ 210, TZ 210 W, TZ 190, TZ 190 W, TZ 180, TZ 180 W, TZ 170, TZ 170 W, TZ 170 SP, TZ 170 SP Wireless.
Firmware/Software Version: All SonicOS Enhanced Versions
Services: L2TP Server
Introduction
This document explains how to configure L2TP Client access to the SonicWALL GroupVPN SA using the built-in L2TP Server and Microsoft's L2TP VPN Client. Access will be granted to the LAN behind the SonicWALL security appliance for L2TP client users, and all Internet traffic for these users will also be routed through the VPN tunnel. This is not a split tunnel configuration. This guide is for SonicOS Enhanced 2.x, 3.x, 4.x and 5.x firmware. The guide is intended for Microsoft Windows XP Service Pack 2 (SP2) users. Non-SP 2 or SP1 users may not be able to use this guide, as Microsoft has recently updated the L2TP client.
L2TP Server configuration on the SonicWALL Appliance
Follow these steps to configure the SonicWALL security appliance to accept the L2TP connection:
Step 1: Select Network > Address Objects
Step 2: Add the following address object:
· Name: 'L2TP Subnet'
· Type: Network
· Network: 192.168.10.0 (The Class C network address of your L2TP Pool)
· Netmask: 255.255.255.0
· Zone Assignment: VPN |
 |
Step 3: Select Users > Settings and make the following configuration change:
- Authentication Method: RADIUS + Local Users
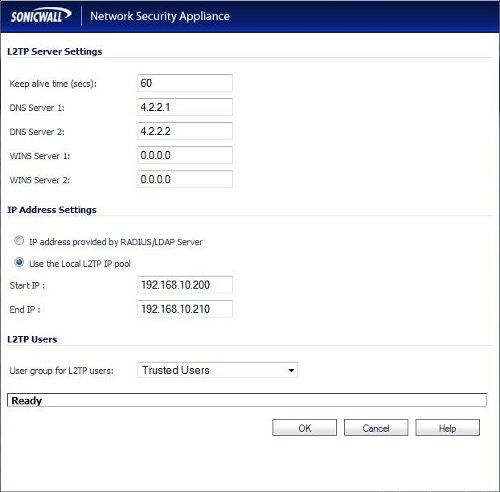
Step 4: Select VPN > L2TP Server, enable the L2TP Server, click Configure and set the options as follows:
· Keep alive time (secs): 60
· DNS Server 1: 4.2.2.1 (or use your ISP's DNS)
· DNS Server 2: 4.2.2.2 (or use your ISP's DNS)
· DNS Server 3: 0.0.0.0 (or use your ISP's DNS)
· WINS Server 1: 0.0.0.0 (or use your WINS IP)
· WINS Server 2: 0.0.0.0 (or use your WINS IP)
· IP address provided by RADIUS/LDAP Server: Disabled
· Use the Local L2TP IP Pool: Enabled
· Start IP: 192.168.10.200 *EXAMPLE*
· End IP: 192.168.10.210 *EXAMPLE* Note: Use any unique private range.
· User Group for L2TP Users: Trusted Users or Everyone |
 |
Step 5: Select Users > Local Users
Step 6: Add a user and add these objects to the VPN Access list:
· L2TP Subnet
· WAN RemoteAccess Networks
· LAN Subnets |


 |
NOTE: Alternatively, you can add these networks to the Everyone or Trusted Users Group. Also, add any other Address Objects to which you require access.
Step 7: Select Network > NAT Policies and add a NAT Policy with these settings:
· Original Source: L2TP Subnet
· Translated Source: WAN Primary IP (X1 IP) - we have X2 as primary WAN
· Original Destination: Any
· Translated Destination: Original
· Original Service: Any
· Translated Service: Original
· Inbound Interface: Any
· Outbound Interface: WAN or X1 - we have X2 as primary WAN
· Comment: L2TP Client NAT
· Enable NAT Policy: Enabled
· Create a reflexive policy: Disabled |
 |
Step 8: Select VPN > Settings and configure the WAN GroupVPN policy with the following settings:
General tab:
Proposals tab:
· IKE (Phase 1) Proposal
· DH Group: Group 2
· Encryption: 3DES
· Authentication: SHA1
· Life Time (seconds): 28800
· IPSec (Phase 2) Proposal
· Protocol: ESP
· Encryption: 3DES
· Authentication: SHA1
· Enable Perfect Forward Secrecy (PFS): Disabled (Optional)
· DH Group: Disabled (Not applicable if PFS is disabled)
· Life Time (seconds): 28800 |
 |
Advanced tab:
- Enable Windows Network (NetBIOS) Broadcast: Disabled (Optional)
- Enable Multicast: Disabled (Optional)
- Management via this SA:
- HTTP: Disabled (Optional)
- HTTPS: Enabled (Optional)
- Default Gateway: 0.0.0.0
- Require Authentication of VPN Clients via XAUTH: Enabled
- User Group for XAUTH Users: Trusted Users or Everyone
- Allow Unauthenticated VPN Client Access: Disabled

Client tab:
· Cache XAUTH User Name and Password on Client: Always
· Virtual Adapter settings: DHCP Lease
· Allow Connections to: "This Gateway only" or "All Secured Gateways" (if you need access to site-to-site VPN's).
· Set Default Route as this Gateway: Disabled
· Use Default Key for Simple Client Provisioning: Disabled |
 |
Step 9: Select VPN > DHCP over VPN, choose Central Gateway, click Configure and make the following adjustments:
- Use Internal DHCP Server: Enabled
- For Global VPN Client: Enabled
- For Remote Firewall: Disabled
- Send DHCP requests to the server address listed below: Disabled
- Relay IP Address (Optional): 0.0.0.0
Step 10: Select Firewall > Access Rules and Add this VPN to WAN rule:
· From Zone: VPN
· To Zone: WAN
· Source: WAN Remote Access Networks
· Destination: Any
· Service: Any
· Action Allow
· Users: All |
 |
Step 11: Select Firewall > Access Rules and Add this VPN to LAN rule:
· From Zone: VPN
· To Zone: LAN
· Source: L2TP Subnet
· Destination: LAN Subnets
· Service: Any
· Action Allow
· Users: All |
 |
The SonicWALL portion of the configuration is complete. |